Our neighborhood is full of boys. Without thinking too hard, I can think of 6 boys besides Michael between the ages of four and six. At least three of them will enter kindergarten with him. Well, if I decide to send him to kindergarten they'll go off together.
For a complete contrast, there are no other little girls in the neighborhood. On the occasions when Ava finds a great playmate at the park or in a playplace, I so enjoy watching her bond with other little girls. I really do need to find a regular playmate for her. Completely by coincidence, we ran into a preschool classmate of hers at McDonalds a couple of weeks ago. The girls played together beautifully and we lingered well longer than usual to let her play. I made a point of introducing myself to her parents and exchanged email addresses with her mother. We met once more a couple of weeks later, but I haven't heard from them since.
Yesterday we ran into twins (boy/girl) from Ava's preschool class at the park. Again, I made a point to introduce myself to their mother and exchange email addresses. I dutifully sent an email expressing our openness to setting up a playdate.
To be honest, the entire process feels a little artificial and awkward, but I do it anyway. I want Ava to have the opportunity to develop friendships and this feels like a first step. If I decide to homeschool, I'll need to reach out to a new community of people and try to provide opportunities for my children to interact with other children in settings other a traditional school. I suppose this is good practice. I just wish it felt a little more natural though. A bit of ongoing success would be nice too.
Monday, April 30, 2012
Sunday, April 29, 2012
Project Round-Up
Without further ado, here are several random projects from this week.
Project 1 - Word Wheel
I was getting ready for a reading lesson (the one homeschooling curriculum I have not reviewed yet, but intend to get to soon) and was inspired to make a word wheel. Our lesson called for reviewing 12 different word endings and I didn't want to make 12 different spinners, so I modified her design a little and came up with this. Six additional word endings are hidden under the smaller paper plate, but are revealed as you spin. You can practice by matching each of the 12 word endings with a single initial consonant or by sliding all 6 initial consonants by the same word ending.

Project 2 - Glass Gem Suncatchers
The children wanted to "do art" with some decorative glass gems I had around for playing on the light boxes. I remembered a project I saw at Play At Home Mom. I set the kids up with inexpensive frames on their light boxes. I slapped Mod Podge all over the outer surface of the glass and let the children stick glass gems to it. After they were dry we hung them in the windows. They are quite pretty.

Project 3 - Pattern Strips
The RightStart Math kit came with some great colored square tiles. The kids were having a blast playing with them. We used them as pattern blocks to make houses and other designs. We made patterns. We built towers. We made paths for squinkies to walk on. The kids were having so much fun playing with them I decided to make some pattern strips to add to the mix.
I spent about 90 minutes during nap one day making pattern strips. I couldn't wait to show the kids. They played with the strips for about 90 seconds before deciding they were quite boring. Guess every project can't be a win. :-)

Saturday, April 28, 2012
Website Recommendation: daddyread.com
If you're looking for an annotated list of recommended books to read to your children DaddyRead is a great place to find it. The website has informational articles on how to read to your kids, but the heart of the site is annotated lists of books to read aloud to children separated by recommended ages. There are lists of picture books for infants through second grade. There are lists of recommended read-aloud chapter books for preschool through third grade and up. There's even a list of recommended chapter books for reluctant readers.
I started with the list of read-aloud chapter books for preschoolers and reserved five of the recommended books from our local library. We started Moongobble: Dragon of Doom today. Michael is loving it. It makes Ava a bit wiggly, but as long as she's allowed to wander the room a bit she follows along too. The chapters are short and have a couple of black and white illustrations per chapter. We've finished 5 of 13 chapters. The book is the first in a series so we'll know where to go next if the children enjoy this first one all the way through.

I started with the list of read-aloud chapter books for preschoolers and reserved five of the recommended books from our local library. We started Moongobble: Dragon of Doom today. Michael is loving it. It makes Ava a bit wiggly, but as long as she's allowed to wander the room a bit she follows along too. The chapters are short and have a couple of black and white illustrations per chapter. We've finished 5 of 13 chapters. The book is the first in a series so we'll know where to go next if the children enjoy this first one all the way through.

Friday, April 27, 2012
The Weekly Review: Week 58
SLP Idea of the Week
Melissa did a post on Chasing Cheerios about writing sight words on uncooked (white) beans and tossing them in a bag to use for sight word practice on the go. You could do the same thing with your target articulation words. Then play a game with a sock monster or other hand puppet where the children say the word on the bean before feeding the puppet. I played with the kids the other day making the sock monster respond appropriately (he spat the "cat" back out hacking up hair, for example) and the kids absolutely loved it and begged to play again and again.Ava this Week
We started a gymnastics class. Because it is a class of both three and four year olds, the children can attend together. I adore watching the children through the window. They've only gone twice so far, but I saw a big difference in their willingness to experiment and ability to follow along between the first week and the second. Ava is so comfortable in her body and actually looks pretty graceful for a three year old.The first time we went Ava needed to go to the bathroom in the middle of the 45 minute session, so the second time I made a point of taking her immediately before class. At the gym, she went potty right before class started. So when she came out in the middle of class to ask me to take her again I told her no. She went back in and immediately sat down crying refusing to participate any more. I caved. I went in and took her. She did, indeed need to go, but seriously. The child should be able to go 45 minutes without peeing, yes?
Weekly Michael
Early in the week Michael told me he wanted to write a story called "Lion on the Loose" and he needed my help. I told him he should write it. He (admittedly accurately) countered that he couldn't really write well enough yet. So I pulled a chair up next to my computer, opened word, and invited him to dictate to me as I typed. He LOVED it. After I got the story down we went through and chose some pictures to insert as illustrations. Then we printed and stapled the book and he promptly sat down and read it. I had fun too.


Then, a couple of days later I walked by his computer and discovered this:

He had typed (clockwise) "cat sat on du(the) mat". Not a bad beginning at all.
Ava's and Michael's Weekly Home Therapy Notes
This week has been even worse than last. I've still been doing mostly solo parenting in the evenings and we've done relatively little home therapy. I'll do my best to reset and reintroduce our nightly sessions next week.Weekly Homeschooling
We've continued math, handwriting, and reading. So far the kids and I are still having a great time. Math lessons are their favorites. Handwriting is probably second, although I can tell the novelty of the current practice methods is wearing off. I'll have to get creative soon. The reading program is great, but the lessons are a little too long for the kids. I need to cut the length back on those, and I think they'll enjoy the reading lessons more.Homeschooling has totally changed my outlook on "home days" (days with no preschool). I look forward to the mornings because we're all enjoying the homeschooling lessons. Our experiment with homeschooling is going extremely well thus far.
Weekly Random New Experimental Craft
Completely on a whim I decided to try some paper quilling. Perhaps I saw some on pinterest and it lodged in my subconscious, but I don't actually remember what gave me the idea. Here's what I came up with (inspired by this). Somehow, they make me really happy.
Thursday, April 26, 2012
Throwing all caution to the winds...
I finally decided to give Michael free access to a wide variety of art materials. Scissors, tape dispenser, glue, paper, a wide variety of collage materials, and permission to raid the recycling bin at will. He'll also request random items at the grocery store for art projects. Most recently, he needed to choose a very specific box of pasta that has featured prominently in several recent projects.
The results have been prolific and remarkable. And, for once, that is not code for disastrous. He has been having a blast. So far, I have not discovered puddles of glue on the floor, scraps of items that shouldn't be cut, or piles of collage materials and raw pasta strewn about. Instead, I keep discovering random projects laying about or proudly taped on the walls.
This graces my front door:

I found these on his art desk: (his ability to create 3D objects with paper/cardboard and tape is impressive)


Exploration of the human figure:


I'm told this is the sun coming out after a tornado.

After incorrectly guessing train, fire truck, and spaceship I was informed that this was a car.

I watched Michael cut a piece of white cardstock into approximately 50 tiny pieces and then painstakingly tape them back together into this:

It wasn't until he taped it to his chin and called it a mustache that I realized he was going for a beard.
The boy is happily doing self-directed art projects from the moment he wakes up until he falls back asleep at night. Why didn't I give him all the materials months ago?
Wednesday, April 25, 2012
RightStart Mathematics-Level A: Review and Printable Progress Chart
I became intrigued slightly obsessed with the concept of homeschooling and decided to try a little bit of homeschooling during the next year and a half of preschool to see if we like it. Since Michael has a bit of an affinity for math that was one of the curriculum areas I looked into.
Months ago a homeschooling mother mentioned RightStart Math on a blog I read. Since I adore good concept based curricula I clicked through her link to check out the program and fell in love. In fact, I'm pretty sure the seed for my current fascination with homeschooling was planted right there. A couple of months ago when I decided to take things to the next level RightStart Math was high up on my list of programs to investigate.

RightStart Math focuses on building a strong conceptual understanding of math concepts rather than memorization of facts and strategies. The program is extremely hands-on and involves heavy use of manipulatives and multisensory learning. The core tool of the program is a special abacus that is grouped into fives and tens for quick visual recognition of quantities. The program is divided into five levels A through E that correspond roughly to taking a child through a grade school math curriculum. They recommend you start Level A at age 5 or sooner.
I decided to get the deluxe starter kit for Level A (pictured above) which includes the Level A teachers manual, student book, and all accessories necessary to teach the complete lessons in the book. I got two abacuses so that both of my children could use an abacus at the same time. Check out a sample of the RightStart Level A teacher's manual. Everything arrived promptly nicely packaged in a large box. So far, I've only unboxed/unwrapped the items I've needed for the lessons we've done so far.

So far we've done the first five lessons (the first four are included in the sample pages you can check out for free and the first four only require items you can find around your home if you'd like to check the program out before purchasing). Each lesson is a two page spread in the manual and the lessons have been easy to follow so far. I read through the lesson ahead of time and gather any materials I will need to teach the lesson and make some notes. Here's the next lesson we're about to do in the teacher's manual and some notes I made about modifying the lesson.
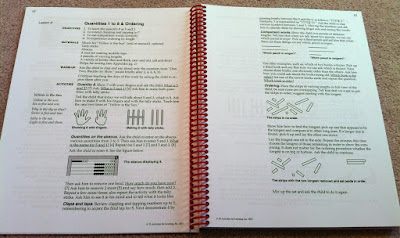

Now, due to an early childhood where I was taught to NEVER make marks in books I still can't bring myself to write in books so I make copies of the lessons and keep them in a single binder with the lessons for other things we're working on. I also keep the progress chart I made for RightStart Level A in the binder along with other random supplies we need for our lessons. After we do each lesson I make notes about how it went and move it to a finished section in the binder. Feel free to download and use the progress chart if you happen to be using RightStart Math Level A with a student (or students).


I've taken to keeping all the supplies for our math lessons on a single tray so that when the time comes for a lesson all I have to do is grab the tray and my lesson binder. So far, the lessons generally take about 10-15 minutes and then I let the children play with the manipulatives on the tray as long as they like. I use that time to make notes, read through the next lesson, and stock the tray with whatever I'll need for the next lesson. The kids love the math lessons and are excited every time I pull out the math tray.

In summary, I'm extremely pleased with RightStart Math. The children adore it and look forward to math time more than anything else we are working on so far. Now, we've only done 5 lessons at this point, so this review is based upon my initial impression of the program and its materials and the initial responses of my children to the first five lessons.
Tuesday, April 24, 2012
Small anecdote
We were getting Michael (age 4 years, 5 months) ready for bed a couple of nights ago and completely out of the blue he initiates the following conversation:
Michael: 3 sevens is 20.
Us: No sweetheart, 3 sevens is 21.
Michael: But I counted and three sevens is 20.
Us: No baby, we promise - 3 sevens is 21.
Michael: (slight pause) ...then, two sevens and a six is 20.
Us: Stunned silence.
Michael: 3 sevens is 20.
Us: No sweetheart, 3 sevens is 21.
Michael: But I counted and three sevens is 20.
Us: No baby, we promise - 3 sevens is 21.
Michael: (slight pause) ...then, two sevens and a six is 20.
Us: Stunned silence.
Monday, April 23, 2012
Speech Card Set Activity: Bang! - Speech Articulation Version
I came across a great idea for a flashcard game at Come Together Kids. As a classroom teacher, Laura played the game Bang! with her students when wanting to drill facts. Because I'm always looking for new games to play with articulation cards, modifying the game for articulation drill was the first thing that came to mind.

Find an old container to toss some cards into. Decorating it is purely optional. Toss in the articulation card deck of your choice and a few Bang! cards (found below).
Set a timer for a reasonable amount of time (3-7 minutes ish).
Taking turns, each player pulls out one card at a time without looking. If they say the speech card correctly (in isolation, times three, in a phrase, in a sentence, whatever way you like) they get to keep it in their pile. If not, the card goes back in the container.
If the player pulls out a Bang! card everyone yells Bang! and the player has to put their entire pile back into the can.
When the timer goes off the player with the most cards wins.

If you liked this card set activity you might also like:
Sunday, April 22, 2012
DIY Day: Homemade Bath Paints and Cardstock Mini-Shelf
Yesterday was a day of spontaneous do-it-yourself projects around here. As an afternoon project we tried making a cardstock mini-shelf per the tutorial on the Family Fun website.

Ava chose the pieces of cardstock she wanted to use and the configuration (a flower). I did all the cutting and gluing. She helped me tape the tubes together. She seemed delighted at the finished product and loved putting it up in her room.
____________________
I also made some homemade bath paints using small squeeze bottles I keep around for various projects (colored glue, colored water on the light box, colored vinegar on the light box). I filled each bottle about 2/3 with liquid hand soap and added food coloring. Then I tossed in a tsp. or so of cornstarch and mixed it all up. Voila! Bath paints. The kids had so much fun with them.


Saturday, April 21, 2012
Seven Favorite Read-Alouds
Here are seven of our favorite read-aloud bedtime (and naptime) stories in this house. These are all books we own and have read and enjoyed many, many times.

These are listed in no particular order of preference. They are all wonderful.
1. Barn Dance! by Bill Martin Jr. and John Archambault of Chicka Chicka Boom Boom fame. I love this story. The rhythm of the verse is infectious, the illustrations are beautiful, and the story speaks to curiosity and adventure. Anyone with a bit of bluegrass or country in their background will particularly enjoy the animal square dance at the heart of the story.
2. The Gingerbread Girl by Lisa Campbell Ernst. I love reading this as a sequel to The Gingerbread Man (Read the Gingerbread Man first!). This story picks up some time after the poor end of the Gingerbread Man with the old couple's second attempt at making a gingerbread cookie. This time things turn out differently. The story is such fun to read. My children are delighted every time I pull it out. One small warning - it has an unfortunate use of words ("dumb", "airhead") when the fox first meets the gingerbread girl and I choose to switch those words for "silly" when I read it to my children. I would definitely NOT let that stop you from picking up this book.
3. The Gingerbread Man by Jim Aylesworth and Barbara McClintock. This, by far, is my favorite telling of the gingerbread man tale. The rhythm and rhyme are perfectly written so that this is incredibly fun to read and to listen to. The verse repeats many times during the telling of the story and my children love to chime in and tell the story along with me.
4. The Clock Struck One: A Time-Telling Tale by Trudy Harris. This is a creative extension of the nursery rhyme/song Hickory Dickory Dock. The book is fun to read (sing) and enjoyed by both parent and child. As a bonus, if you take only a few seconds to show the kids, they will learn how to tell time to the hour.
5. The Gruffalo by Julia Donaldson. This book is a tale of a clever mouse taking a walk through the woods avoiding predators using his wits and telling a tall tale about an imaginary creature called a gruffalo. Imagine his surprise when he runs into the gruffalo and needs to quickly use his wits again to avoid becoming the gruffalo's meal. The rhythm and rhyme make this book fun to read and the story is interesting enough to hold up to repeated readings. There is just enough scary to make the children enjoy pretending to be afraid without actually scaring them. I also enjoy watching the children come to understand just why the mouse's tricks worked.
6. Stuck in the Mud by Jane Clarke. This book tells, in rhyme, the story of a mother hen trying to get her chick out of the mud. She becomes stuck and then her would be rescuer becomes stuck. And then the next and the next until the entire barnyard is stuck in the mud. The book is fun to read and the twist at the end always gets a giggle. It also happens to be a great book for working on final consonant deletion.
7. Egg-napped! by Marisa Montes. This is a tale of what happens when Gabbler the goose and his wife find their beloved egg missing and all the forest animals try to help them get it back. Again, it is the rhyme that makes this book so much fun to read. The story is full of fun, adventure, a bit of suspense and danger, and a satisfying ending.
Does anyone have some favorites of their own to share? I'm always looking for great new books to read with the kids.
Friday, April 20, 2012
The Weekly Review: Week 57
SLP Idea of the Week
Land of Nod sells a wooden tic-tac-toe board (which I do not own). I think the board looks beautiful and appears to be sturdy. I also think you could cut my printable speech cards to size and put them in the holes and then have the children play speech tic-tac-toe. You could also draw a tic-tac-toe grid and just deal a card into each of the nine spots and play speech tic-tac-toe without purchasing the beautiful wooden playing board. I wonder if my three and four year old children could play the game?Favorite Blog Post This Week
One of my absolute favorite blogs to read is Swistle. She consistently writes well thought out posts about topics I find interesting and just seems to be a genuinely good person. This week she wrote about children and swearing (the little swear words like "hate", "stupid", and "sucks") which fortunately aren't much of an issue yet for me. I liked her idea that using them is a privilege based upon the user's ability and wisdom to use them in moderation, appropriately, in certain settings, with specific audiences (not in front of small children, or in front of grandparents for example). That gets around the do as I say, but not as I do contradiction most people get into when they simply forbid the use of such words. Anyway, it was a well thought out post and you should check it out if it interests you.Ava this Week
Ava's really perfected crocodile tears this week and oh-my-gosh is it driving me crazy. At first, she only used them when she got a minor scrape or bump, or during small altercations with her brother and so it wasn't immediately obvious that the crying was completely fake. So I reinforced it with lots of snuggles and hugs and by immediately fixing her problem. From her point of view, this was great. So then she moved on to bursting into sobs every time I tell her no.For example, yesterday morning I put her hair in a ponytail. Once we were done she asked if I had done a braid and when I said no she started sobbing. The performance included real tears. She hadn't even actually asked for a braid and I hadn't actually told her no. I told her I wasn't even going to listen until she stopped crying and asked nicely. And then I left the room. It took her a minute to turn the tears back off. She asked nicely and then got her braid. I feel a bit mean and heartless walking away from my sobbing 3 year old, but I will not reinforce that behavior any more. She's also taken to responding to simple requests (please put on your shoes) with a simple, one word, reply: "no". I'm nipping that one in the bud too. Fun times in Avaland lately.
Weekly Michael
Ahh how the behavioral tides rise and fall in this house (read - currently rising). Michael is experimenting to find out what level of snarkiness (mild backtalk) will be tolerated. Fortunately he isn't pushing too hard. A relatively mild redirection usually works. He'll say something slightly rude. I'll tell him that wasn't an acceptable way of talking in our house and model a more appropriate alternative and he'll correct himself. Gotta love experimentation.Ava's and Michael's Weekly Home Therapy Notes
Other than our nightly readings of the articulation practice booklets there has been little structured speech practice this week. I've been solo parenting in the evenings all week due to a huge work thing going on for my husband and so I've been taking it easy in the evenings with the kids.Weekly Homeschooling
We're working with math, handwriting, and reading. We get in about two 20 minute lessons during an at-home morning (M, W, F). So Monday we did math and reading. Wednesday we did handwriting and math. Today we'll do reading and handwriting. I call the lessons "special activities". We do one activity. Then the children go off and play a while. Then I call them back for the second activity. We fit in breakfast, lunch, outside time, and other random projects in too so the morning flies by.Thursday, April 19, 2012
Handwriting Without Tears: Review and Printable Progress Chart
Michael is starting to write. However his grip is awkward and he draws his letters rather than writing them using a consistent sequence of lines and curves. I've been wanting to do some homeschooling, so I chose a handwriting program as one of the first curriculum programs to try with the children.

I chose Handwriting Without Tears (HWT) for our handwriting curriculum. It isn't the prettiest printing style out of the many options for handwriting styles. I chose it because I like how it is taught. The program was developed by occupational therapists. It teaches uppercase letters first because they are develpmentally easier for young children to write. All of the uppercase letters can be written by writing big lines, little lines, big curves, and little curves.
The program is well structured. Rather than teaching the letters in alphabetical order, the letters are grouped by the way they are written. The first 8 letters taught are F, E, D, P, B, R, N, and M. They are called "frog jump" letters because your pencil has to hop back to the starting corner after making the first big line. After learning those letters children learn the other uppercase letters that start in the upper left corner. Finally they are taught the letters that start in the upper center spot. After learning all the uppercase letters, the first lowercase letters learned are the ones that are exactly the same as their capitals, just smaller.
I also liked the way that they begin teaching letters without using a writing implement at all. They start with blocks (big line, little line, big curve, little curve) and play dough (roll the shapes and combine to form letters). The wet-dry-try method on a small chalkboard is brilliant because the child must develop a tripod grip in order to do it and they think it is so much fun. In the wet-dry-try method you write the letter in chalk on the chalkboard first. They take a tiny sponge and trace over your letter mimicing the strokes necessary to write the letter. Then they take a tiny ball of paper towel and trace the (now wet) letter a second time drying it in the process. Once dry, you can still see where the letter used to be on the slate. For the last step they try writing the letter themselves on the slate with a small piece of chalk. By the time they are done, they've observed once, and "written" the letter three times. My children often continue the cycle wetting again with the sponge, drying again with the paper towel, and writing again with the chalk at least 2-3 more times before becoming bored.
The teacher's manual for the Kindergarten level is wonderful. It educates you about the handwriting process. It talks about readiness and gives examples of many fun activities you can do with pre-writers to develop readiness skills. It describes multi-sensory ways to teach handwriting (music, movement, blocks, wet-dry-try, door tracing, imaginary writing, magnet board, roll-a-dough/sensory tray). It covers posture, paper, and pencil skills. All of that is covered before it starts on the actual lessons covered in the kindergarten curriculum. In the back of the manual there are tips for addressing issues with handedness, pencil grip, and pencil pressure.
I ordered the teacher's manual, student workbook, roll-a-dough tray, magnet board, slate, chalk, and sponges. I haven't touched the student workbook yet. . My children are little (3 and 4 years). They still need to develop some fine motor readiness skills before working with writing. I read through the entire teacher's manual. I intend to go through all of the "frog jump" capital letters just using the manipulatives first before having them use pencil/crayon/paper. So far we've done E, F, and D. The children love the wet-dry-try on the slate, the roll-a-dough tray (which I use by finger tracing with salt), and the magnet board. I use the slate for every lesson and switch between the magnet board and tray. One child uses the slate while the other uses the tray/magnet board and then they switch. I wish I had bought two slates.


Once the tripod grip is more natural and they're completely comfortable with the frog jump letters I'm going to try having them write the letters using tiny pieces of crayon on construction paper rectangles I cut to fit the sensory tray. Then I'll switch to a piece of regular paper with 6 rectangles on it. Then I may pull out the student workbook and start having them do the workbook pages.
I made a progress / reinforcement chart for the kids because they love putting stickers on a chart, and they like seeing how much progress they've made over time. Feel free to download it and use it with your own children/students if you happen to be using the Handwriting With Tears Kindergarten program yourself.


Each "lesson" only takes us 10 minutes although I allow the children to continue to play with the manipulatives as long as they like. The more they "play", the more they develop those fine motor pre-writing skills. I couldn't be happier with the program and with our first foray into homeschooling.
Wednesday, April 18, 2012
Final /k/ Homework Booklet: Free Speech Therapy Articulation Picture Book
My children love doing these articulation booklets during bedtime reading. I'm having trouble making enough of them. They want to read 2-3 of them each night. They've both run out of room for stickers in the sticker spot at the bottom of the cover. Michael has decided that his new goal is to cover all the white space on the cover of Alfie the Elephant with stickers and then turn over and cover the back too.
When I introduce a booklet for the first time the children need a fair amount of prompting to remember the target words. By the fifth or sixth time they are easily remembering all of the words and "reading" large chunks of the sentences as well. It's a great exercise in transitioning to phrases and sentences and they're begging to do it. It doesn't get better than that. Once the children are pretty good at the stories you can have them read the stories to each other, to a pet, to a friend, or to a grandparent as well.
I recommend you print on cardstock for durability.

Here is a picture of a homework booklet (the /l/ booklet) printed on cardstock and folded into the booklet. It slides nicely in between board books to be pulled out and read during bedtime story time.

When I introduce a booklet for the first time the children need a fair amount of prompting to remember the target words. By the fifth or sixth time they are easily remembering all of the words and "reading" large chunks of the sentences as well. It's a great exercise in transitioning to phrases and sentences and they're begging to do it. It doesn't get better than that. Once the children are pretty good at the stories you can have them read the stories to each other, to a pet, to a friend, or to a grandparent as well.
Final /k/ Homework Booklet
To download click on the image to open it full size. Then right click on the image, choose "save as" and save the page to your computer.I recommend you print on cardstock for durability.

Description
This articulation homework booklet is designed to be an extension of my single-syllable card sets. The target words are all one syllable words that include no blends and no vocalic /r/ sounds. This booklet is designed to be read by a parent (or therapist, older sibling, classmate, teacher...) and child together. The helper reads the typewritten words pausing for the child to "read" the picture words. Each time the book is read, the helper can put a sticker/stamp/checkmark in one of the boxes on the front of the book. This will encourage multiple practice readings. The child's fluency should increase with each repeated reading. The words on the back page can be used for either auditory bombardment before reading the book together or for drill after finishing reading the book (or both). The target audience for these cards are children with speech delays who are ready to practice final/k/ sounds in a more natural context. Move to these exercises to add complexity and increase generalization after the child has achieved good accuracy with single words, single word repetitions, and simple alternating single words with the final /k/ sound.Key Features
- This booklet features 20 final /k/ words incorporated into a simple story to be read by a helper and child together.
- The target words are one syllable words that do not contain vocalic /r/ sounds or any blends.
- The words are easily understood by or easily taught to young children.
Permissions
I give permission to copy, print, or distribute this booklet provided that:- Each copy makes clear that I am the document's author.
- No copies are altered without my express consent.
- No one makes a profit from these copies.
- Electronic copies contain a live link back to my original and print copies not for merely personal use contain the URL of my original.
Looking for Feedback
I would love to hear back from anyone who uses this booklet. Let me know if you find errors or there is anything you would change. Comment on this page, or send me an email at testyyettrying(at)gmail(dot)com.Where can I find more?
More card sets and related printables are on my Free Speech Therapy Articulation Cards page.Here is a picture of a homework booklet (the /l/ booklet) printed on cardstock and folded into the booklet. It slides nicely in between board books to be pulled out and read during bedtime story time.

Other Speech Practice Booklets Available:
Tuesday, April 17, 2012
Speech Card Set Activity: Old Maid - Speech Articulation Version
The kids love Speech Switcheroo. They enjoyed Speech Fours. Next I decided to try to adapt the classic Old Maid card game (follow the link if you don't know the rules).

This is the first card game I've tried with the kids where you really do need to keep your cards hidden from the other players. At three and four, that is a little too difficult for them to manage without assistance. I used an idea I found for using a recycled egg carton for a simple homemade hands-free card holder. I used a carton for 18 eggs which was perfect because once cut in half it let each child have a set of 9 cards at once which was just enough. Other ideas for homemade hands-free card holders are using a pool noodle, using two CDs, and using an old shoe box.

I just printed two sets of some of my free articulation cards and an Old Maid card to add to the deck (get Old Maid cards below). That gives you a set of articulation cards with the Old Maid card necessary to play Old Maid with your kids.

To be honest, the game didn't work well for us. The children were distracted using the card holders for the first time. Also, Ava (at only three years old) didn't really get the concept of taking someone else's cards as part of the game play. She pitched a mini-fit every time someone pulled a card from her hand. Old Maid would probably work better with slightly older children.
If you liked this card set activity you might also like:
Monday, April 16, 2012
Initial /fl/ Homework Booklet: Free Speech Therapy Articulation Picture Book
Initial/fl/ Homework Booklet
To download click on the image to open it full size. Then right click on the image, choose "save as" and save the page to your computer.I recommend you print on cardstock for durability.

Description
This articulation homework booklet is designed to be an extension of my single-syllable card sets. The target words are all one syllable words that include no blends other than the initial /fl/ blend and no vocalic /r/ sounds. This booklet is designed to be read by a parent (or therapist, older sibling, classmate, teacher...) and child together. The helper reads the typewritten words pausing for the child to "read" the picture words. Each time the book is read, the helper can put a sticker/stamp/checkmark in one of the boxes on the front of the book. This will encourage multiple practice readings. The child's fluency should increase with each repeated reading. The words on the back page can be used for either auditory bombardment before reading the book together or for drill after finishing reading the book (or both). The target audience for these cards are children with speech delays who are ready to practice initial /fl/ sounds in a more natural context. Move to these exercises to add complexity and increase generalization after the child has achieved good accuracy with single words, single word repetitions, and simple alternating single words with the initial /fl/ sound.Key Features
- This booklet features 12 initial /fl/ words incorporated into a simple story to be read by a helper and child together.
- The target words are one syllable words that do not contain vocalic /r/ sounds or any blends other than the targeted /fl/ blend.
- The words are easily understood by or easily taught to young children.
Permissions
I give permission to copy, print, or distribute this booklet provided that:- Each copy makes clear that I am the document's author.
- No copies are altered without my express consent.
- No one makes a profit from these copies.
- Electronic copies contain a live link back to my original and print copies not for merely personal use contain the URL of my original.
Looking for Feedback
I would love to hear back from anyone who uses this booklet. Let me know if you find errors or there is anything you would change. Comment on this page, or send me an email at testyyettrying(at)gmail(dot)com.Where can I find more?
More card sets and related printables are on my Free Speech Therapy Articulation Cards page.Here is a picture of a homework booklet (the /l/ booklet) printed on cardstock and folded into the booklet. It slides nicely in between board books to be pulled out and read during bedtime story time.
Other Speech Practice Booklets Available:
Sunday, April 15, 2012
What have we learned exactly?
Michael has chronic nasal congestion. To be honest, we didn't prioritize it until recently. At first he had just started preschool and seemed to be sick all the time. Then it was winter and he still seemed to be sick all the time. However, this spring, we simply had to acknowledge something more was going on.
We took him to the pediatrician (paying our co-pay) and she referred us to an allergist and to an ENT. We went to the allergist (paying another, more expensive co-pay) who did skin testing. Many things showed up positive on that skin test but somehow I was still left with no clear answers. Then we went to the pediatric ENT (paying a third co-pay) who said that everything looked fairly normal. Come back in 3 months if pursuing the allergy hypothesis doesn't clear things up and he'll scope him to get a good look at his adenoids at that time.
So, following three different doctor visits, one allergy skin test, and two new medications we're left with some improvement in the nasal congestion and no concrete answers. I hate ambiguity.
________________________________
A year ago I did a post on therapy techniques for helping children move from one-word to two-word utterances.
Saturday, April 14, 2012
It started so well...
I was solo parenting the other night and decided that a super long bath would be a great way to finish off the evening. I set the kids up in the tub with some bath paints (mix shaving cream with liquid tempera paints). They were excited. The paints looked great. I left the room and sat in the armchair in Michael's room eavesdropping while simultaneously relaxing.

Over the next 50 minutes I listened to them happily playing together. I heard them decide to paint families (the discussion about how big a mama should be was particularly funny). They shared paint with each other. They erased and started over. Conversation never ceased. It was lovely. I could hear them showing off their art to each other.
Then Ava called, "Mama, mama! Come see what we did." I knew I had been lucky to get 50 minutes and it was time to put them to bed anyway, so I headed to the bathroom expecting to see two adorable pictures of families on the tub walls. After all, that was what they had been discussing the entire time.
I was a bit surprised to find this:

They were terribly proud of it though. And it gave us the opportunity to review that when all colors are mixed they make brown. It really only took a couple of minutes with a shower to clean everyone up and move on with the night. It certainly wasn't two adorable family self-portraits though.
Friday, April 13, 2012
The Weekly Review: Week 56
SLP Idea of the Week
Viktorya at Speech Language Play has such a fun idea for what to do with articulation cards that have been mastered. She prints out my free articulation cards in black and white and uses them with her students. Then, when the students have thoroughly mastered a card and no longer need to drill with it they get to feed it through a little hand crank powered mini paper shredder. What fun! I can think of lots of variations on this children would enjoy. Tear it up. Cut it with scissors. Run it through a paper crimper. Crumple it and try to throw it in the trash can. I'll definitely have to print some on regular paper in b/w (instead of in full color on cardstock) just so we can try this. I think my kids will love it.Ava this Week
One night I was getting some extra work in on the computer after dinner, but before the children went to bed. My husband was doing dishes in the kitchen. Ava came up to me and asked if she could have the stack of speech cards sitting next to me on my desk. I'll admit I looked at her a little suspiciously and asked her why she wanted them. She replied, "So I can do speech with Daddy!". I handed them over and watched her find a spot on the carpet, sit down, and start laying the cards face up on the carpet waiting patiently for her Daddy to come join her. She didn't actually notice that she'd neglected to invite him to play. I snuck into the kitchen to tell him what was going on. He abandoned his dishes and let her teach him "speech". It was so adorable.Weekly Michael
Fine motor is finally kicking in for Michael. He's enjoying drawing pictures. He prefers his magnadoodle, dry erase board, or an iPad, but will use colored pencils or crayons and paper when necessary. He always tells elaborate stories about his pictures. One day this week he was staying at my mom's house and drew this picture on her iPad. I love seeing him find a new way to exercise his imagination. (It is a hot air balloon. What looks like hair on the passenger is actually the hot air balloon's flame.)
Ava's and Michael's Weekly Home Therapy Notes
/s/, /f/, /l/, and blends are falling into place for Ava. We've also recently re-introduced /k/ (only in final position) and she's finally making progress there. If she isn't paying attention, /k/ will always be /t/. When she is paying attention, with multiple types of cues, she's getting a back sound about 65% of the time. Yea! Progress. Hopefully it will all be downhill from here.Michael's doing well with his /s/ and /f/. His /s/ sound can be easily corrected now when he's paying attention. His /f/ production is starting to lighten up a little and sound a bit more natural. I'm going to let him settle into those for at least another couple of weeks before even considering starting /th/ with him.
Weekly Homeschooling
I went ahead and ordered a couple of homeschooling curriculum programs. This week we did a math lesson and a handwriting lesson. They took about 20 minutes each (not consecutively) and the children and I had a great time. I look forward to continuing as soon as our schedule permits. I'll write more about the specific curriculum materials I purchased and what I think of them soon.Thursday, April 12, 2012
Homemade Doctor Kit Accessories - Play Prescription Pad and Broken Bone X-Rays
Michael and Ava had their annual pediatrician checkups recently and subsequently started playing doctor. Michael was making bandages out of tape and paper, which was adorable, but I did decide to buy the doctor's kit I found at Walmart to give them some props to add more dimension to their play. Then I had some ideas for some things I could make at home to add to their kit: a play prescription pad and some pretend broken bone x-rays.


Grab some glue (I used Mod Podge - I can't guarantee something else will work), a paintbrush and some binder clips. Cut a piece of thin cardboard (like from a cereal box) to the same size as your stack of play prescription paper to use as the back of the pad. Use the binder clips to hold the top together tightly. I only had five binder clips, but if you have more, use as many as possible so you can hold the pages together tightly along the entire top. Remove one clip at a time, painting the edges of the paper together with the glue then replace the clip to hold them as they dry. Do this to the paper under each binder clip until the entire edge is coated. Let dry for 15 minutes and then repeat. And repeat. And repeat. Once you have a fairly thick coating that is thoroughly dry you're done. Show your kids how to use their new prescription pad and toss it in their doctor bag along with a pencil/marker/crayon.

I did a google image search for broken bone x-rays and chose ones with really obvious breaks in four different bones (collarbone, leg, arm, finger). I printed them on a single piece of paper. I wanted our x-rays to be fairly small so they would store inside their play doctor's bag. I printed them and then traced along the outline of the main bone and edges of the break with a pencil to be sure they would show up. I cut out each x-ray and cut a second piece of paper to place on top. In this way, I made it so that the x-ray would need to be held up to a light to be examined. Then I made a frame from black construction paper and a little label for each x-ray. I took the final product and covered it in contact paper for durability. They can examine the x-rays by holding them up against a bright window or by placing them on one of our homemade light boxes.

Making a Play Doctor Prescription Pad
Michael likes to pretend to write prescriptions. On a whim I decided to try to make a prescription pad. I made a template and printed 20 copies (I printed mine in b/w because I've run out of color ink.). Save to your computer by clicking to open the full size image then right clicking and choosing "save as". Print and then trim off the footer and cut the pages in half.

Grab some glue (I used Mod Podge - I can't guarantee something else will work), a paintbrush and some binder clips. Cut a piece of thin cardboard (like from a cereal box) to the same size as your stack of play prescription paper to use as the back of the pad. Use the binder clips to hold the top together tightly. I only had five binder clips, but if you have more, use as many as possible so you can hold the pages together tightly along the entire top. Remove one clip at a time, painting the edges of the paper together with the glue then replace the clip to hold them as they dry. Do this to the paper under each binder clip until the entire edge is coated. Let dry for 15 minutes and then repeat. And repeat. And repeat. Once you have a fairly thick coating that is thoroughly dry you're done. Show your kids how to use their new prescription pad and toss it in their doctor bag along with a pencil/marker/crayon.
Making Play Broken Bone X-Rays

I did a google image search for broken bone x-rays and chose ones with really obvious breaks in four different bones (collarbone, leg, arm, finger). I printed them on a single piece of paper. I wanted our x-rays to be fairly small so they would store inside their play doctor's bag. I printed them and then traced along the outline of the main bone and edges of the break with a pencil to be sure they would show up. I cut out each x-ray and cut a second piece of paper to place on top. In this way, I made it so that the x-ray would need to be held up to a light to be examined. Then I made a frame from black construction paper and a little label for each x-ray. I took the final product and covered it in contact paper for durability. They can examine the x-rays by holding them up against a bright window or by placing them on one of our homemade light boxes.
Subscribe to:
Posts (Atom)